Made in Germany
1. Background information
1.1 History
1.2 Paint structure
1.3 Reasons for paint ageing
1.4 General information on paint care
1.4.1 When should the vehicle be cleaned?
1.4.2 When should the vehicle be polished?
1.4.3 When should the car be waxed?
1.4.4 Twelve tips for paint care
1.5 The paint care plan – always well maintained
2. Basic cleaning – optimal preparation for polishes and waxes
2.1 Insects, tar and resin stains
2.2 Choosing the right product + application tips
2.2.1 A1 Speed Shampoo
2.2.2 CW1:100 Insect Remover Gel
2.3 Advice from a professional
3. How to remove scratches correctly
3.1 How scratches are caused
3.2 Types of scratch
3.3 How to remove scratches
3.3.1 Choosing the right product:
- for fine scratches
- for more intense scratches
- for scratches as far as the primer
3.3.2 Correct application:
- for fine scratches
- for more intense scratches
3.4 Are different polishes needed for metallic and normal paint?
4. How to remove the gloss haze?
4.1 Why do paints weather?
4.2 How to remove the grey or gloss haze
4.2.1 Choosing the right product
4.2.2 Correct application
5. Protection & sealing for paint
5.1 Why sealing is necessary
5.2 How to seal and protect paint
5.2.1 Choosing the right product
5.2.2 Correct application
6. Using polishing machines
6.1 Polishing machines
6.1.1 Angle polishers without eccentric
6.1.2 Eccentric polishing machines
6.2 Polishing attachments
6.2.1 Lambskin
6.2.2 Sponges
6.3 How to use polishing machines correctly
6.3.1 Use on heavily weathered or heavily scratched paintwork
6.3.2 Use on slightly matt or slightly scratched paintwork
6.3.3 Holograms
6.4 What should be considered when machine polishing?
Development steps in the technology of car painting
Even the first automobile, the “Benz-Patent-Motorwagen”, was given a protective coating to protect it from corrosion: “Common black pitch”. At the end of the 19th century, it still had to be applied with a brush. Today, high-performance paints are available in around 25,000 colour shades.
Step by step, the paintwork has been adapted to the latest technology and increased requirements:
One-coat systems: the coloured paint forms a hard and glossy top coat
Until 1920
Oil paints:
At first, the same paints, mostly based on linseed oil, were used for cars as were used in carriage construction. Those who had money relied on paints made from liquefied amber resin. The colour palette was clear: muted blue, black, green, maroon, beige or red was the choice.
20s and 30s
Nitrocellulose paints:
These matt paints only got their shine with dedication, polishing paste and a linen cloth. This was difficult to maintain because the paints were susceptible to weathering and quickly became dull as the binder degraded step by step. On the other hand, a car could be painted in 15 hours instead of the weeks it used to take.
From the 30s to the 60s
Alkyd resin paints:
Nitrocellulose paints were used until the 1960s, but in the mid-1930s a new technique set the tone: Melamine and urea paints were mixed with alkyd resin. Now it was possible to produce lighter, more colourful shades. The surface was harder and no longer needed to be polished. A car was painted in 4 hours.
The two-layer systems: the colour-giving layer is protected by a glossy clear paint layer
70s and 80s
Acrylic resin paints (2K paints):
2K paints had a higher resistance than the alkyd resin paints and dried much faster. At this time, metallic paint also came into fashion. It is applied in two parts: a colouring base coat containing aluminium particles and a clear coat as a finish.
From the 90s
Water-based paints:
Improving environmental compatibility is generally about reducing the amount of solvents. Water-dilutable or low-solvent technologies are used. Innovative colour pigments come into play for the first time. The mother-of-pearl effect is born.
Car paints have a strong visual function. It is not for nothing that the same car looks completely different in white than in red. Above all, however, it protects the vehicle from chemical attacks such as corrosion, from scratches or environmental influences such as bird droppings or yellowing due to UV radiation. Wafer-thin – the structure of modern paints is not even as thick as a human hair.
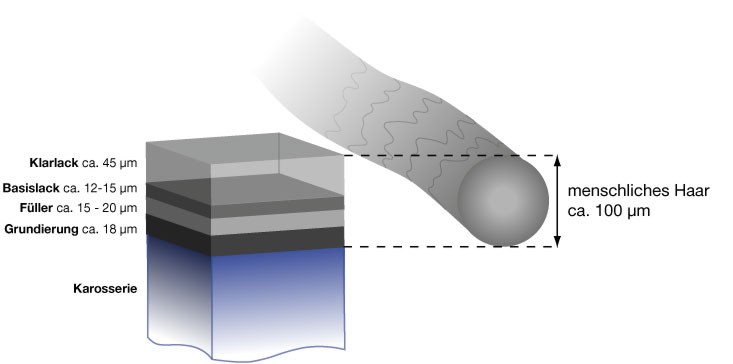
Clear coat (approx. 45 µm)
Is applied last. For weather resistance, gloss retention, impact resistance and protection against chemical substances.
Base coat (approx. 12-15 µm)
The colouring layer. Effect pigments for metallic paints or the pearlescent effect are also integrated here.
Filler (approx.15-20 µm)
Equalises even the finest unevenness in the substrate and also serves as corrosion protection.
Primer (approx. 18 µm)
Is exclusively responsible for the corrosion protection of the vehicle.
As thin as the paint layer on a car is, it has to perform even better. Although continuous innovations have improved the quality and durability enormously, the paintwork is exposed to constant attacks by chemical, mechanical and environmental influences. Only high-quality and, above all, regular care can counteract this.
1. Environmental influences
Paint expands in hot weather and contracts in cold weather. Other exposures are rain, snow and salt.
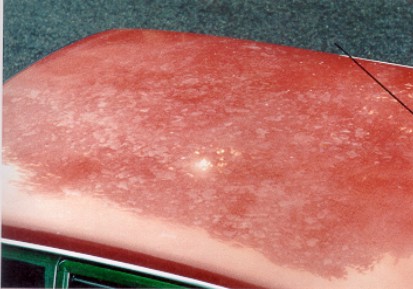
2. UV radiation
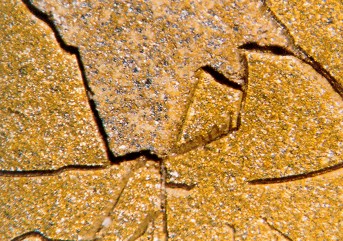
Sun makes the varnish brittle and cracked – it loses its shine.
3. Nature
Insects, bird droppings, pollen etc. contain very aggressive substances which, in combination with moisture or acid rain, can damage the paintwork after just 10 minutes.
4. Dust & wind
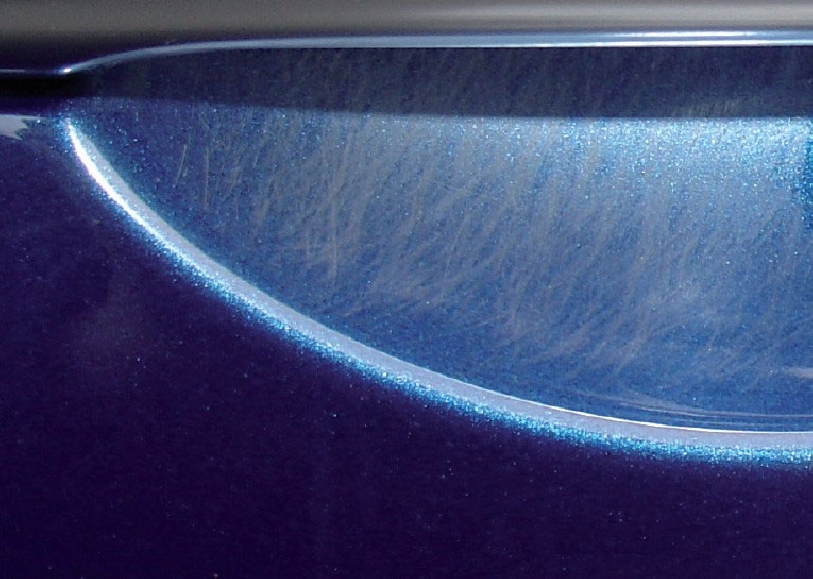
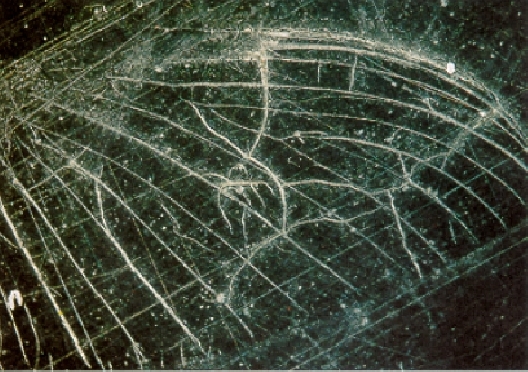
Every car that stands outside is exposed to them. Every day, the finest scratches are “sanded” into the clear coat. Over time, this makes the paintwork look dull and lacklustre.
5. Car wash
The speed of the brushes working on the car is high enough that they leave fine, sometimes even clearly visible scratches in the paintwork.
6. Sone impact
An impacting stone – even if it is only a pebble – can damage the paintwork down to the primer if the impact speed is high enough.
1.4.1 When should the vehicle be cleaned?
Even if it is sometimes a nuisance, the car should be cleaned as soon as it is dirty.
1.4.2 When should a vehicle be polished?
If you notice that the paint gradually loses its deep gloss, this is called gloss haze. This is caused by fine scratches and weathering in the paintwork. The abrasives contained in the polish remove this gloss haze. The care components contained in the polish restore the original deep gloss of the paintwork. If the paintwork of your car contains neither scratches nor appears dull, you do not need to polish it.
1.4.3 When should the car be waxed?
You can tell whether your car needs waxing by the way water beads on the paintwork. If the water forms round, small beads, waxing is not necessary. If the water runs over a large area, the preservation must be renewed. Important: Regular waxing is indispensable for maintaining the value of the vehicle. It provides the paintwork with lasting protection against the aggressive effects of weather, UV radiation, insects and even car wash brushes.
1.4.4 Twelve tips for paint care
1. Wash by hand – this is best for the paintwork. Car washes leave marks with their brushes and textile cloths that look like scratches.
2. Throw away old washing utensils – dirty, worn sponges or washing brushes can leave fine scratches.
3. Wring out the sponge – it’s better to wash out your sponge a few too many times when cleaning.
4. Be as thorough as possible – make sure insect remains or particle dirt etc. are completely removed from the paintwork so that no scratches occur during polishing and waxing.
5. Dispose of the residual water – do not tip the residual water from the car wash over the car. The dirt particles it contains will stick to the paintwork and can cause scratches when it is rubbed off.
6. Remove aggressive dirt immediately – bird droppings, tree resins and similar substances can damage unwaxed paintwork within 10 minutes.
7. Do not use cleaning agents containing wax – they reduce the effect of the polishes and impair an even result when waxing because one wax layer lies on top of another.
8. Do not use cotton wool before polishing or waxing – cotton wool is extremely unsuitable for applying polishes or waxes. It absorbs the moisture of the product too quickly and makes an even application almost impossible. Polishing also does not work with cotton wool. It is not absorbent enough and the film is not removed but spread out. This results in clouds and streaks!
9. Polish in good time – if you discover scratches in the paintwork or the deep gloss visibly diminishes, polish the vehicle. This ensures a beautiful appearance and more value retention.
10. Wax regularly – as long as water forms small, round beads on the paintwork, it is sufficiently protected. If water forms a surface, you should wax urgently. The wax provides lasting protection against the weather and aggressive dirt.
11. Inspect your car wash – make sure the washing instruments are clean and intact.
12. Let a professional do it – if you want to remove scratches with wet sandpaper, make sure you leave this to a professional company so that the paintwork is not damaged afterwards.
Care recommendation
For the easy-going car owner:
Step 2:
A1 Scratch Polish
= For selective application, e.g. door handle recesses
Recommended accessories
= Ideal for A1 Speed Polish, A1 Polish & Wax and A1 ULTIMA Show & Shine Polish
= Ideal for A1 Speed Wax Plus 3
A1 THE CLOTH – Premium microfibre
= Buffing without streaks or clouding
Optimal paint care begins with basic cleaning of the paint and prepares the surface ideally for polishes or waxes. It is worth choosing the right cleaning products depending on the degree of soiling: Car shampoo, insect remover, tar and resin remover, etc. ensure that the dirt is completely removed and that no residues can further impair the paintwork.
Insect residues, tar or resins, bird droppings, etc. react very aggressively with car paints and are usually difficult to remove, especially if they have been allowed to act for a longer period of time (see also 1.3 Reasons for paint ageing).
Aggressive dirt such as insect remains, bird droppings, resins and tar should be completely removed from the paintwork as quickly as possible. They can cause damage to the paintwork within a very short time – after only 10 minutes on unwaxed paintwork. If the dirt is still fresh, a thorough cleaning with
is sufficient. Dried-on or burnt-on dirt can be removed in no time with CW1:100 Insect Remover Gel.Important: CW1:100 Insect Remover Gel also removes the protective wax layer. It is therefore essential to seal the paintwork permanently with a wax afterwards (see also 5. Protection & sealing for the paintwork). Only an intact wax layer can provide the paintwork with long-lasting protection against the effects of weather, UV radiation, car wash scratches or aggressive dirt.
The product is used for pre-treatment before polishing and waxing and for regular car washing. Rinse off coarse dirt with plenty of water. Shake bottle well before use. Pour
with the dosing cap (25 ml makes 10 litres of wash solution) into a bucket and fill with a strong stream of water. Wash the vehicle from top to bottom. This is best done with a standard vehicle sponge. In the case of heavy soiling, lather the vehicle thoroughly before washing and allow to soak in briefly. The washing liquid should not be allowed to dry because it already contains dirt particles that can stick to the paintwork again when it dries and lead to unsightly dirt streaks. You can also clean the car in sections and rinse off the treated parts individually. Finally, rinse thoroughly with a soft water jet. You can also clean the car in sections and rinse off the treated parts individually. Rinse off the remaining water carefully. This will prevent water spots on the paintwork.2.2.2 CW1:100 Insect Remover Gel
Before driving through the car wash or before hand washing, spray the problem areas (windscreen, bonnet, radiator grille, bumper, headlights, exterior mirrors) with CW 1:100 Insect Remover Gel and leave to act for 3 to 5 minutes. Use a sponge to help with stubborn stains. Then rinse thoroughly with water.
Tip: Please do not use a fly sponge or glass sponge on painted surfaces. These are very hard and cause scratches.
If there are still stains on the paint after cleaning, feel the area for unevenness. If no unevenness is noticeable, this is unfortunately paint damage that usually cannot be completely removed even by polishing.
Enhance your sense of touch with cellophane foil (e.g. cigarette foil). Wrap a piece around your finger and then feel over the paint. Now you can feel almost every imperfection effortlessly.
Scratches are most often caused by:
3.3.1 Choosing the right product:
For fine scratches
For fine scratches, products containing abrasives are best suited: Polishes.
Abrasives differ in their particle size and particle hardness. However, only a certain proportion of an abrasive is suitable for the optimal treatment of a paint surface. Particles that are too coarse can scratch the paintwork additionally, while those that are too fine do not develop a sufficient polishing effect to remove scratches. A high-quality polish has to find exactly the right proportion so that scratches are removed and no new ones are created by the polish. Abrasives with different particle size and hardness are combined here. A1 Speed Polish offers the right performance here. You can also find out more in our 1.5 Paint Care Plan.
For more intense scratches
Synthetic abrasives are used to remove more intense scratches that do not reach the primer. They are characterised by an extremely uniform particle size and break down into smaller and smaller nanoparticles during the polishing process. This prevents the polish from additionally attacking the paint instead of just removing the scratch. The “nano-technology polishing bodies” thus ensure particularly safe and permanent removal of scratches. On this basis, the research laboratories of Dr. Wack Chemie have developed A1 Scratch Polish.
For scratches as far as the primer
When scratches go down to the primer of the paint, a professional paint repair helps to prevent further damage.
3.3.2 Correct application
For fine scratches
Clean the paint thoroughly before applying a polish (see also 2. Basic cleaning – optimal preparation for polishes and waxes). For an ideal effect, please do not apply the product on heated paintwork or in the blazing sun. Do not use products containing wax beforehand. They worsen the sanding effect! DO NOT apply the product with cotton wool or a cloth. These aids fray quickly and absorb unnecessarily much of the product. The result is an uneven distribution of the product. This leads to streaks and the so-called “clouds”.
Wash the vehicle with A1 Speed Shampoo and then dry thoroughly. Remove any surface rust with the A1 Flash Rust Remover. Shake bottle well before use. Apply the polish (A1 Speed Polish or A1 Polish & Wax) to a dry A1 THE Polishing SPONGE (our accessory recommendation for optimum product application) and polish in evenly on the clean and dry paintwork with a lot of PRESSURE in small circular movements. The more pressure you apply during polishing, the better the result will be. Always keep A1 THE Polishing SPONGE sufficiently saturated with product and add more if necessary. Ensure a thin, even application. After drying, it is very easy to check whether the product has been applied without gaps. The polish forms a visible film. Rework where there is no closed film. After applying the product to the paint, allow it to dry completely. Simply wipe off any excess product with A1 THE CLOTH - Premium Microfibre and buff up. Turn the cloth frequently. The cloths are very absorbent, whereas other products such as cotton wool are quickly soaked up. Then the polishing layer is no longer absorbed but only pushed back and forth on the paint. This makes the result uneven. Whether you have started polishing too early is usually indicated by a tendency to smear. Finally, wash A1 THE Polishing SPONGE thoroughly. To achieve an even result, we recommend treating the entire body parts in one go.
For optimum preservation of the polishing result, we recommend permanently sealing the paintwork with A1 Speed Wax Plus 3.
Tip: Abrasive residues on unpainted plastic parts – such as bumpers – can be removed very easily and without any problems with A1 Plastic Care Matt or Glossy.
For more intense scratches
Clean the paint thoroughly before applying a scratch polish (see also 2. Basic cleaning – optimal preparation for polishes and waxes). For ideal cleaning performance, please do not apply the product on heated paintwork or in the blazing sun. Do not use products containing wax beforehand. They worsen the sanding effect!
Shake the tube of A1 Scratch Polish well before use. Lightly moisten the blue high-performance polishing cloth. If the cloth is too wet, this will reduce the polishing performance. Dispense a little A1 Scratch Polish onto the blue polishing cloth (approx. 1 cm diameter). Spread the polish onto the surface to be polished before polishing. Now polish it in for up to one minute using small, circular movements and plenty of pressure. To produce a good result, it is very important that you apply plenty of PRESSURE as you polish. Always keep the blue polishing cloth sufficiently moist and add more product if necessary. Then allow the polished areas to dry off fully and wipe off any polish residue using the white wiping cloth provided. Other products, such as cotton wool, are quickly soaked up and the polish coating is no longer absorbed, but merely pushed back and forth on the paintwork. This makes the result uneven. During the drying process, the active ingredients anchor themselves to the paint and form a wafer-thin protective layer. Whether you have started polishing too early is usually indicated by a tendency to smear. Repeat the process if necessary. Treat larger areas in sections.
For optimum preservation of the polishing result, we recommend permanently sealing the paintwork with
.Both metallic and normal paints are provided with a clear coat layer that lies above the colouring paint (see 1.2 Paint structure). Polishes only act on this clear paint layer. Therefore, it has been proven that different products are not necessary for metallic or normal paints.
Car paint is very often exposed to weather and environmental influences. They all damage the paintwork over time.
4.2.1 Choosing the right product
To restore the original gloss to a weathered, faded paint, you need a polish with very well-balanced product properties: Care components and abrasives must be matched to each other in such a way that the shine haze (caused by weathering) is completely removed. At the same time, the abrasives must be able to develop their full effect without causing additional damage to the paintwork, e.g. to be able to remove scratches (see also 3. How to remove scratches correctly). The A1 Speed Polish, A1 ULTIMA Show & Shine Polish and A1 Polish & Wax formulas have been perfected to allow the removal of scratches while at the same time completely eliminating gloss haze. This gives unsightly paintwork an optimal deep gloss and rich colour tone again. Practically like new.
For optimal preservation of this glossy result, we recommend a permanent sealant of the paint with A1 Speed Wax Plus 3.
4.2.2 Correct application
Clean the paint thoroughly before applying a polish (see also 2. Basic cleaning – optimal preparation for polishes and waxes). For an ideal effect, please do not apply the product on heated paintwork or in the blazing sun. Do not use products containing wax beforehand. They worsen the sanding effect! DO NOT apply the product with cotton wool or a cloth. These aids fray quickly and absorb unnecessarily much of the product. The result is an uneven distribution of the product. This leads to streaks and the so-called “clouds”.
Wash the vehicle with A1 Speed Shampoo and then dry thoroughly. Remove any surface rust with the A1 Flash Rust Remover. Shake bottle well before use. Apply the polish (A1 Speed Polish, A1 ULTIMA Show & Shine Polish or A1 Polish & Wax) to a dry A1 THE Polishing SPONGE (our accessory recommendation for optimum product application) and polish in evenly on the clean and dry paintwork with a lot of PRESSURE in small circular movements. The more pressure you apply during polishing, the better the result will be. Always keep A1 THE Polishing SPONGE sufficiently saturated with product and add more if necessary. Ensure a thin, even application. After drying, it is very easy to check whether the product has been applied without gaps. The polish forms a visible film. Rework where there is no closed film. After applying the product to the paint, allow it to dry completely. Simply wipe off any excess product with A1 THE CLOTH - Premium Microfibre and buff up. Turn the cloth frequently. The cloths are very absorbent, whereas other products such as cotton wool are quickly soaked up. Then the polishing layer is no longer absorbed but only pushed back and forth on the paint. This makes the result uneven. Whether you have started polishing too early is usually indicated by a tendency to smear. Finally, wash A1 THE Polishing SPONGE thoroughly. To achieve an even result, we recommend treating the entire body parts in one go.
For optimum preservation of the polishing result, we recommend permanently sealing the paintwork with A1 Speed Wax Plus 3.
Tip: Abrasive residues on unpainted plastic parts – such as bumpers – can be removed very easily and without any problems with A1 Plastic Care Matt or Glossy.
Every car’s paintwork is continuously stressed by environmental influences such as UV radiation, rain, insects, bird droppings, etc. The ideal protection against these attacks is to seal it with a layer of wax (see also 1.3 Reasons for paint ageing). You can easily test whether your paintwork needs a new protective coating by looking at the beading behaviour of water on the paintwork. As long as the water forms small, round beads, there is still sufficient protection. However, as soon as the water spreads over a large area on the paint, the sealant should be renewed.
5.2.1 Choosing the right product
The paint can be perfectly sealed with products such as A1 Speed Wax Plus 3.
5.2.2 Correct application
A1 Speed Shampoo
For ideal cleaning performance, please do not apply the product on heated paintwork or in the blazing sun. To prevent dirt particles from being sealed in, clean the paintwork thoroughly first. Products such as A1 Speed Shampoo are suitable for this purpose. (See also 1.5 Paint care plan and 2. Basic cleaning – optimum preparation for polishes and waxes). Be sure to thoroughly leather the vehicle after washing. Sealing the vehicle with a wax can only work optimally on a dry paintwork.
A1 Speed Wax Plus 3
DO NOT apply the product with cotton wool or a cloth. These aids fray quickly and absorb unnecessarily much of the product. The result is an uneven distribution of the product. Depending on the condition of the paintwork, polish with A1 Speed Polish, A1 ULTIMA Show & Shine Polish or A1 Polish & Wax before use (see A1 Paint Care Plan). Shake bottle well before use. Apply A1 Speed Wax Plus 3 onto a dry A1 THE Wax SPONGE (our accessory recommendation for effortless product application) and apply evenly and thinly to the clean and dry paintwork using small circular movements. A higher film thickness does not mean more performance, but may impair the protective effect. After drying, it is very easy to check whether the product has been applied without gaps. The wax forms a visible film. Rework where it does not form a closed surface. Always keep A1 THE Wax SPONGE sufficiently soaked with product and add more if necessary. Then allow the applied product to dry completely on the paint. During the drying process, the active ingredients anchor themselves to the paint and form a wafer-thin protective layer. Whether you have started polishing too early is usually indicated by a tendency to smear. Finally, wash the A1 THE Wax SPONGE thoroughly. Simply wipe off any excess product with an A1 THE CLOTH - Premium Microfibre and buff up. Turn the cloth frequently. A1 THE CLOTH - Premium Microfibre is very absorbent, whereas other products, such as cotton wool, are quickly soaked. Then the polishing layer is no longer absorbed but only pushed back and forth on the paint. This makes the result uneven. To achieve an even result, we recommend treating the entire body parts in one go.
Tip:
There are 2 types of polishing machines that can be used for polishing paints.
6.1.1 Angle polishers without eccentric
Polishing machines without eccentric show a better grinding effect, but require some skill in handling. Pay particular attention to always keeping the machine horizontal and to the correct speed. If a polisher without an eccentric is handled incorrectly, hologram scratches or even damage to the paintwork can occur.
6.1.2 Eccentric polishing machines
The effective grinding effect is lower with these machines. The eccentric ensures a much smaller polishing movement. On the other hand, experience has shown that they guarantee hologram-free polishing results in combination with sponge attachments and special polishes suitable for eccentric polishing machines. In any case, polishing machines should have sufficient power. At least 200 watts for eccentric polishers and at least 1200 watts for angle polishers. With less power, especially the eccentric machines do not show effective polishing performance.
The most common polishing attachments are made of lambskin or sponges with different structure and hardness. Many eccentric machines from the DIY store are equipped with a textile bonnet.
6.2.1 Lambskin
Lambskin performs best for scratch removal or sanding in general, but is poorly suited for polishing. A hologram-free result is practically impossible here. Therefore, use an eccentric machine with a sponge attachment for finishing.
6.2.2 Sponges
When choosing the right sponge attachment, pay attention to the
different structures and hardnesses. We recommend fine-pored sponges of medium hardness for a good result. The so-called waffle sponges are particularly suitable for a high-gloss finish. If you use an angle polisher without an eccentric, you should be practised in using the sponge attachment. In any case, an eccentric machine with a sponge attachment is also advisable for finishing.
Depending on the condition of the paint you want to work on, one-step or two-step polishing is necessary.
6.3.1 Use on heavily weathered or heavily scratched paintwork
The two-step system has proven itself for professional preparation of the paintwork.
Step 1:
Polish with an angle polisher without eccentric. Observe a minimum power of 1,200 watts, the speed should be infinitely variable. You can use a sponge or lambskin as a polishing attachment. Please note, however, that although lambskin gives the best results in scratch removal, holograms are also likely to occur. Level 1 aims at the optimal sanding effect for maximum removal of weathered paint layers and scratches.
Step 2:
Treat the paint with an eccentric polisher. It should have a minimum power of 200 watts and the speed should be infinitely variable. A fine-pored sponge of medium hardness or waffle sponge is recommended as a polishing attachment. Step 2 ensures a hologram-free polishing result with a perfect high gloss.
6.3.2 Use on slightly matt or slightly scratched paintwork
The polishing effect of an eccentric machine is sufficient for this application. One-step polishing is sufficient.
Polish the paint with an eccentric polisher. It should have a minimum power of 200 watts and the speed should be infinitely variable. A fine-pored sponge of medium hardness or waffle sponge is recommended as a polishing attachment.
The eccentric polisher with sponge attachment removes light weathering marks and fine scratches. At the same time, you achieve a hologram-free polishing result with a perfect high gloss.
6.3.3 Holograms
Hologram scratches often only come to light after polishing, e.g. in the sun. They occur when polishing with angle polishers without eccentrics and become visible as the finest scratches in the direction of the polishing movement. Ideally, you should therefore touch up the paintwork with an eccentric polisher. This way, there will be no unpleasant surprises when the sun hits the freshly polished paint later.
1. Make sure that the pre-cleaning is thorough. Insect remains or particle dirt should be completely removed. Otherwise, they can come loose during polishing and scratch the paint.
2. For the polishing attachment to run smoothly and evenly, it is important that it is placed exactly centred on the polishing machine.
3. Moisten the polishing attachment slightly before adding the polish. This optimises the distribution of the polish right from the start.
4. Apply the polish mainly to the outer area of the attachment. This is where the polisher works at the highest speed and thus with the strongest polishing effect.
5. If the machine has a variable speed, start at a low speed and increase it gradually to avoid splashing. Select the speed so that the machine runs smoothly and evenly and the treated surfaces do not get hot.
6. Always ensure that the polishing attachment is evenly wetted. Dose the polish if necessary or moisten the attachment again.
7. Always hold the polishing machine as horizontally as possible and polish in overlapping paths. This is the best way to avoid hologram scratches.
8. Avoid overheating the paint. Always keep the polisher moving and never polish the same area for a long time.
9. Protect the already polished surfaces from excessive heating. There is a risk of damage to the paintwork when hot polishing.
10. Keep an eye on the polisher’s power cable. It should not rub against the paintwork and scratch it. It is best to hang the cable over your shoulder. If you use a protective cover for the power cable, make sure that it does not collect dirt.
11. Use only scratch-free tools for mechanical polishing. Do not use lambskin here – it can cause hologram scratches. Use textile bonnets for mechanical polishing. Clean them in between, e.g. with compressed air, or use a new one for an optimal polishing result.